By Crasterfarian
This theory proposes that Hadrian’s Wall terminated at Segedunum not due to oversight, but because it needed to go no further. Its tactical position on the outside of a bend in the Tina Fluvius, on a flat plateau between the river ad the Wallsend Burn gave it a huge advantage, both militarily and naval.
It’s accepted that the fort was built where it was so that it had a clear line of sight both upriver to where Bill Quay is now, and down towards the river mouth. This would also add credence to the idea of the Wall extending out into the middle of the river, crowned with a statue of Hadrian depicted as Neptune, which would provide a waterborne fighting platform as well as a lookout for shipping.

It is also plausible that this barrier in the river was used to levy a port entry fee from passing trade ships, not a dissimilar situation to the old hailing station that protruded out into the Tyne at North Shields.

1. The Defensive Function of the Wallsend Burn Ravine
To the northeast of Segedunum lies a deep natural feature, the Wallsend Burn Valley. Instead of building more wall eastward through awkward terrain, the Romans may have used the steep southern slope of the ravine as a natural defensive barrier, anchoring their line at Segedunum and curving it toward Willington Gut.
There may have been a long-rotted, built over embankment and palisade-style barrier along the edge like the original turf wall they built west of the River Irthing to consolidate the edge of the valley.
It’s documented that the Romans cleared the trees and available cover from the land to the north of Banna Fort (Birdoswald) to prevent tribesmen from approaching too close to the fort without being seen. This ‘defendable line’ with a gap for the Roman road, allowing access to Blake Chesters and then onto Penbal Crag.
This narrow gap with wide, open land between it and the fort, would allow invading tribesmen up and onto the wide plateau of land under the modern town of Wallsend. As you can see from the LiDAR images, the land is almost perfectly flat. This would provide a kill zone perfect for cavalry or troops to strike out and face down the marauding Brigantes or Votadini.
2. The Eastern Riverbank as a Roman Port Zone
Between the stub of Hadrian’s Wall (seen entering the river southeast of Segedunum) and the mouth of the Wallsend Burn, the terrain flattens out. Don’t forget a lot of the land in that curve of the river where Swan Hunter was situated has been reclaimed. This northern curve would have provided deeper water almost at the foot of the fort. This area, ideally situated for docking and trade, likely served as a military harbour or Roman port facility, wide enough for mooring ships receiving goods, and transferring troops or supplies inland via the road that led to Penbal Crag.
This also aligns with Segedunum’s location at the navigable bend of the Tyne, the last defensible point where deep-draught vessels could easily dock.
3. Blake Chesters and the Maritime Light System
Luan Hanratty and Gary Holland have long been researching a Roman site at Blake Chesters. Historic references by Collingwood Bruce note a Roman road heading east from Segedunum towards Blake Chesters on the northern riverbank, and remains of a Roman station where Alexander Scott Park is located.
This site may have hosted a small fortlet or a high beacon or pharos, complementing a low light beacon at Clifford’s Fort at North Shields Fish Quay. Together, these would form a leading light system, just like the one at Scarborough or Flamborough, guiding Roman vessels upriver at night or in poor weather.
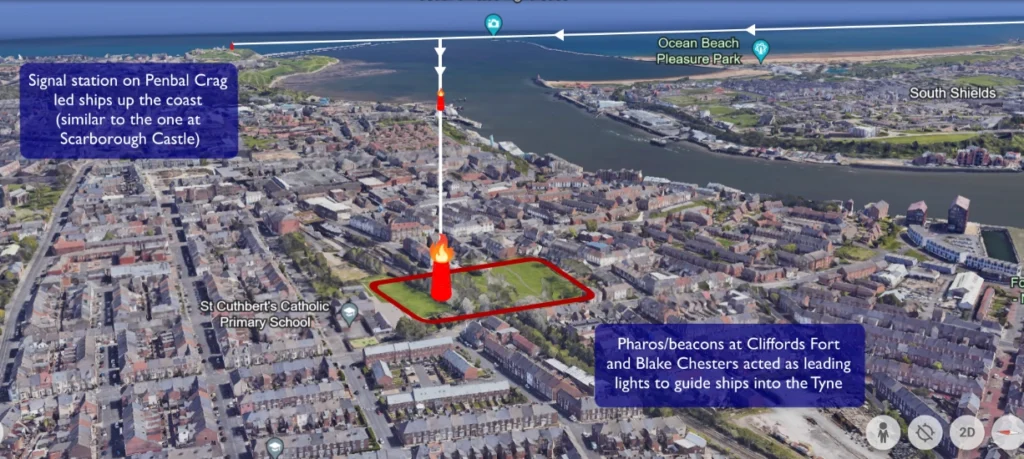
4. Coastal Navigation via Penbal Crag
Before ships even entered the Tyne, a signal station or coastal beacon likely sat atop Penbal Crag, guiding ships north just like Scarborough’s Roman beacon. It would help guide ships from Sunderland, a known early port at the mouth of the River Wear, into the shelter of the Tyne estuary.
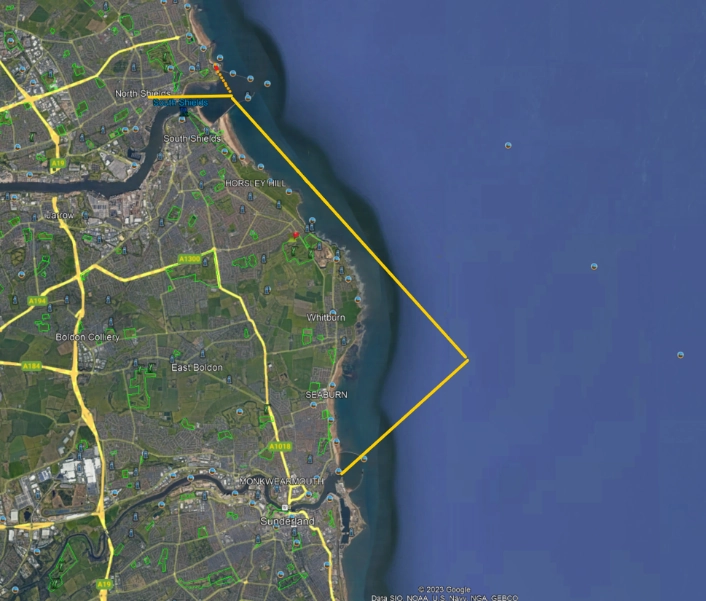
By sailing out of the Wear on an ebbing tide, navigating in a northeast direction, they could head out with a lookout on the port side searching for the light at Penbal, then turn 90 degrees and head northwest until they reached the mouth of the Tyne. Once in the sheltered lee of Penbal they could look up the river, lining the low light at Clifford’s Fort with the high light at Blake Chesters and sail straight passed the treacherous Black Middens rocks. Once in the safety of the river itself, it would be a simple task to navigate up to Segedunum.
This image shows a 3-point navigation chain:
- Penbal Crag (coastal signal)
- Blake Chesters (high light)
- Clifford’s Fort (low light)
- Ensuring safe maritime approach passing the Black Middens rocks
Conclusion
This theory positions Segedunum not as the abrupt eastern end of Hadrian’s Wall, but as the western anchor of a carefully designed defensive and logistical system:
- The Wallsend Burn ravine acted as a natural barrier.
- The flatland north of Segedunum formed a strategic kill zone.
- The space between the Wall’s stub and the ravine was a maritime hub.
- A navigation system would guide ships to the berth.
This all fits tightly with Roman military thinking: minimal effort, maximum control, using terrain, logistics and signalling in a tightly integrated system.
With Love from the Crasterfarian xx
Well done guys. This is really useful information. I appreciate your keen observations.
Best wishes
Ivan